GitHub, creating a repository and linking your project
GitHub is the largest web based hosting service for repositories in the world and we'll go through what github is and how to store your code and use their services in repositories.
In this post I’ll run through what GitHub is and how to use it to get started with saving and storing your coding data in it’s own online backed up source control called a repository. But firstly we need to understand the difference between Git and GitHub so we know how they are different, because many years ago when i first started web development I jumped straight into GitHub without understanding the concepts which would have helped back then.
There are many options for storing your code and source control, but this post is focusing on GitHub.
The details I’ll go over in this post are:
What’s the difference between GitHub and Git?
I’ve gone through what git is in a few of my posts and I have to say, I love git and source control. It has saved me more times than i can count when I’m working on coding projects.
You know those times when you start going down a rabbit hole with a problem you’re trying to solve, or you’re on a roll while working on a new feature…. and then the worst happens and you realise there’s something that you’ve done and it’s either broken everything that you’ve built, or even worse, it’s broken the entire project somewhere.
I’m sure you’ve had that experience and then thought “Oh crap! How am i going to fix this so it works again!?!?”.
Well, this is the perfect example where source control and git can come in and help save you. If you’ve been backing up your work, step by step, then you can actually go back to previous versions of your code and identify the exact step that you may have introduced the issue, or even start again, but keep the changes in a different spot to the actual project so you can refer back to what you did without breaking anything.
This is one of the few ways git can help with your coding, peace of mind, and thanks to git, once I understood how it worked, it also allowed me to be a more creative coder and not worry about trying something that might break because you can always go back ore even reset (reset is not the best option… but we’ll go through that later in this post).
I’ve written a post in detail of what git is and for more detail you can go to this post:
Now, what is GitHub and how i sit different to git? Well, GitHub is an online service for Git Repositories, or your code project that can be stored online. This allows for your code to be stored, with source control, on the cloud and you(or anyone if you choose) can access it on any machine, make changes and then update the code with the changes. It tracks the whole history of all the changes so you have a full record of everything being done.
It’s like your source controlled version of git on your computer, but online. And this means that you can have many people working on the same code/project as everyone can have the same access to it (or you can restrict it to specific people) and using git source control it can also make sure that each coder is not editing or changing something of someone else without being alerted, meaning better collaborative development.
So let’s say you’re working on a project by yourself and you have a friend that is also wanting to help with your code, you can put it in a GitHub repository that they also have access to. Then they copy it to their computer, but it’s still linked to the GitHub version, so when they make changes and save it up to GitHub, then you can see the changes they make and vice-versa.
There are many more things that can be done with GitHub, but we’re just going to focus on the basics of creating and updating a git repository in this post.
What is a Git repository?
A Git repository contains all the details of your project. This is your code, files and a record for every change to every file in your project.
This is what is tracked by all the users that work on a project and allows for everyone to work on the project together without having code being overwritten and making sure the project stays as it should be.
This is the source of all the project code information and it tracks the whole history of the code, what was changed, when it was changed and who changed it. Every change has a unique hash associated with it so you can see exactly when something was done.
When you setup a project with git then there is also a hidden folder that is added to your project that contains all the requirements to manage your projects git source control and it will be shown in the folder as:
.gitThis folder has everything that’s required for git to run, so most of the time it’s probably best not to touch anything in that folder 😅
Prerequisites
Create a GitHub Account
Before we go any further and start creating and linking GitHub repositories with our local code, you’ll need to make sure that you have created a GitHub account.
You can follow the below to create new GitHub account if you don’t have one already:
And if you’re a student, then you can also get their Student Developer Pack for free which give you access to loads of free resources!
Install Git on your machine
You need to have git setup on your machine to be able to use it and I’ve written a post about what git is and how to set it up with some basic level explanations to get you started. I’ll go through in. a little more detail in this post and focus on GitHub, but for installing git you can follow that part of the article here:
Install the GitHub Command Line Interface(CLI) - (optional)
You can also install the GitHub CLI on your machine and then use github commands to manage your repository directly, I’m not going to go into full details on the github cli, but just through I’d mention it as an option.
You can follow the install guide here:
How to create a new repository
Once you have completed the the installation of git and have a GitHub account, we can create a new repository.
There are a few ways to create a new repository, but we’ll create one in the GitHub Dashboard so you can see what it looks like.
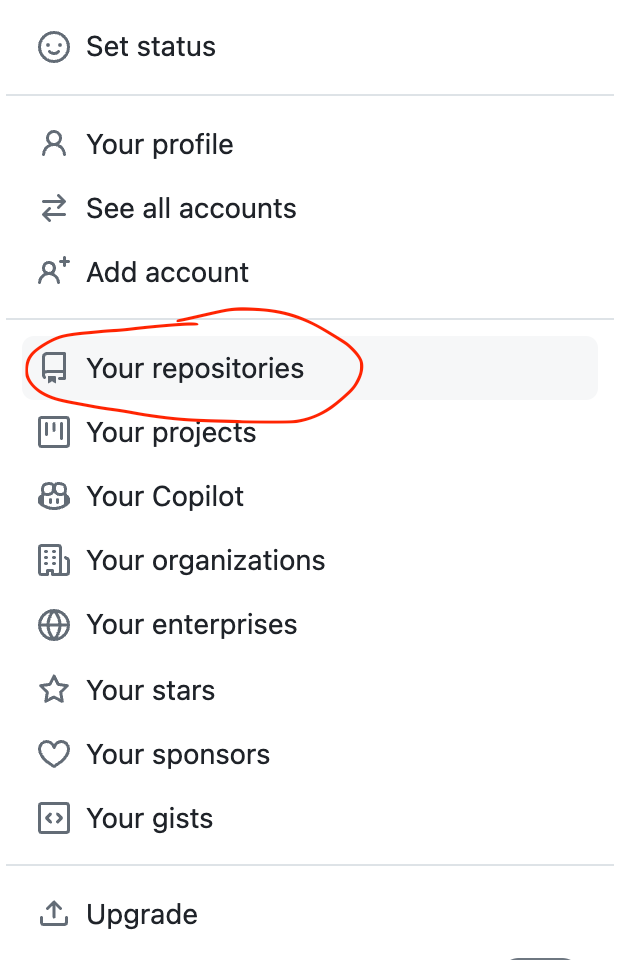
To start this, login to your account and when on the main dashboard, look for the New button to create a new repository, or you can select the Your repositories option from the menu where your avatar icon is in the top right:
The select the New option to create a repository:
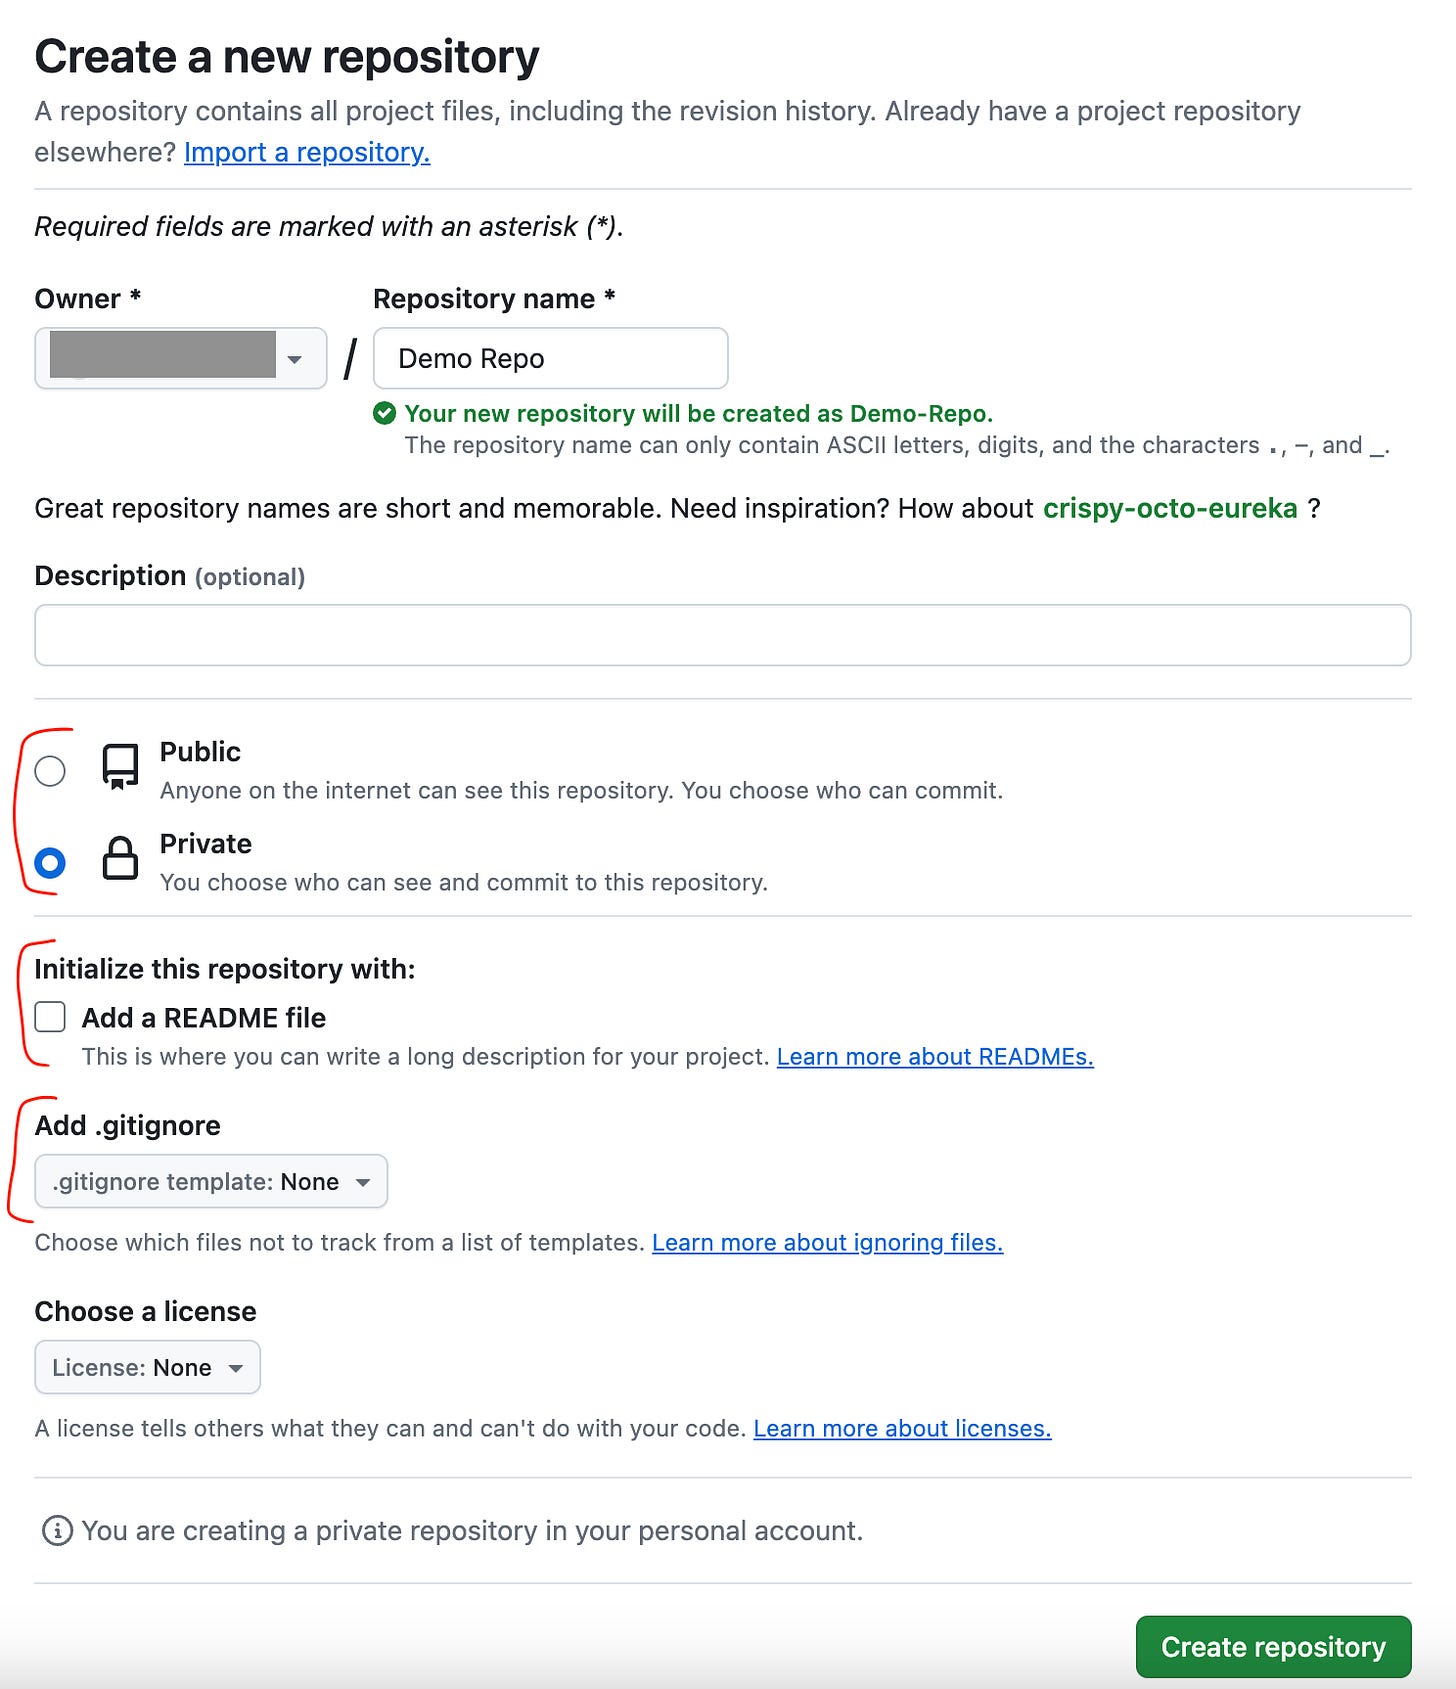
Now this will take you to the Create a new repository form where you can selecte the details of your repo.
A few things to point out here:
Repository name - This is the name of your repo and it will auto format the name for the url it will use and display that, if there is another one with matching name or an error it will alert you
Description - is optional
Visibility - You can choose to have your repository Public or Private, I’m choosing private so only I can see and access it
Initialise this repository with - This will create the project with files already in it
Add a README file - this is a template for a document that is visible to all developers on what your project is and what it’s about
Add .gitignore - I’ll go through this in detail on another post, but this is a file that contains details on what NOT to save - sometimes there are build files or things that are not needed to be saved to the repo, you’d put them in this file. Very helpful so you don’t have thousands of non-needed files saved by accident… (ask any frontend developer if they’ve forgotten to add node_modules to their .gitignore file… what a nightmare 😓)
Choose a license - the license for the code, i.e. open source, etc
*NOTE: For the first example I’m leaving these all as empty and None, so that i can create a repository that has Nothing in it to start with
Then click on Create repository.
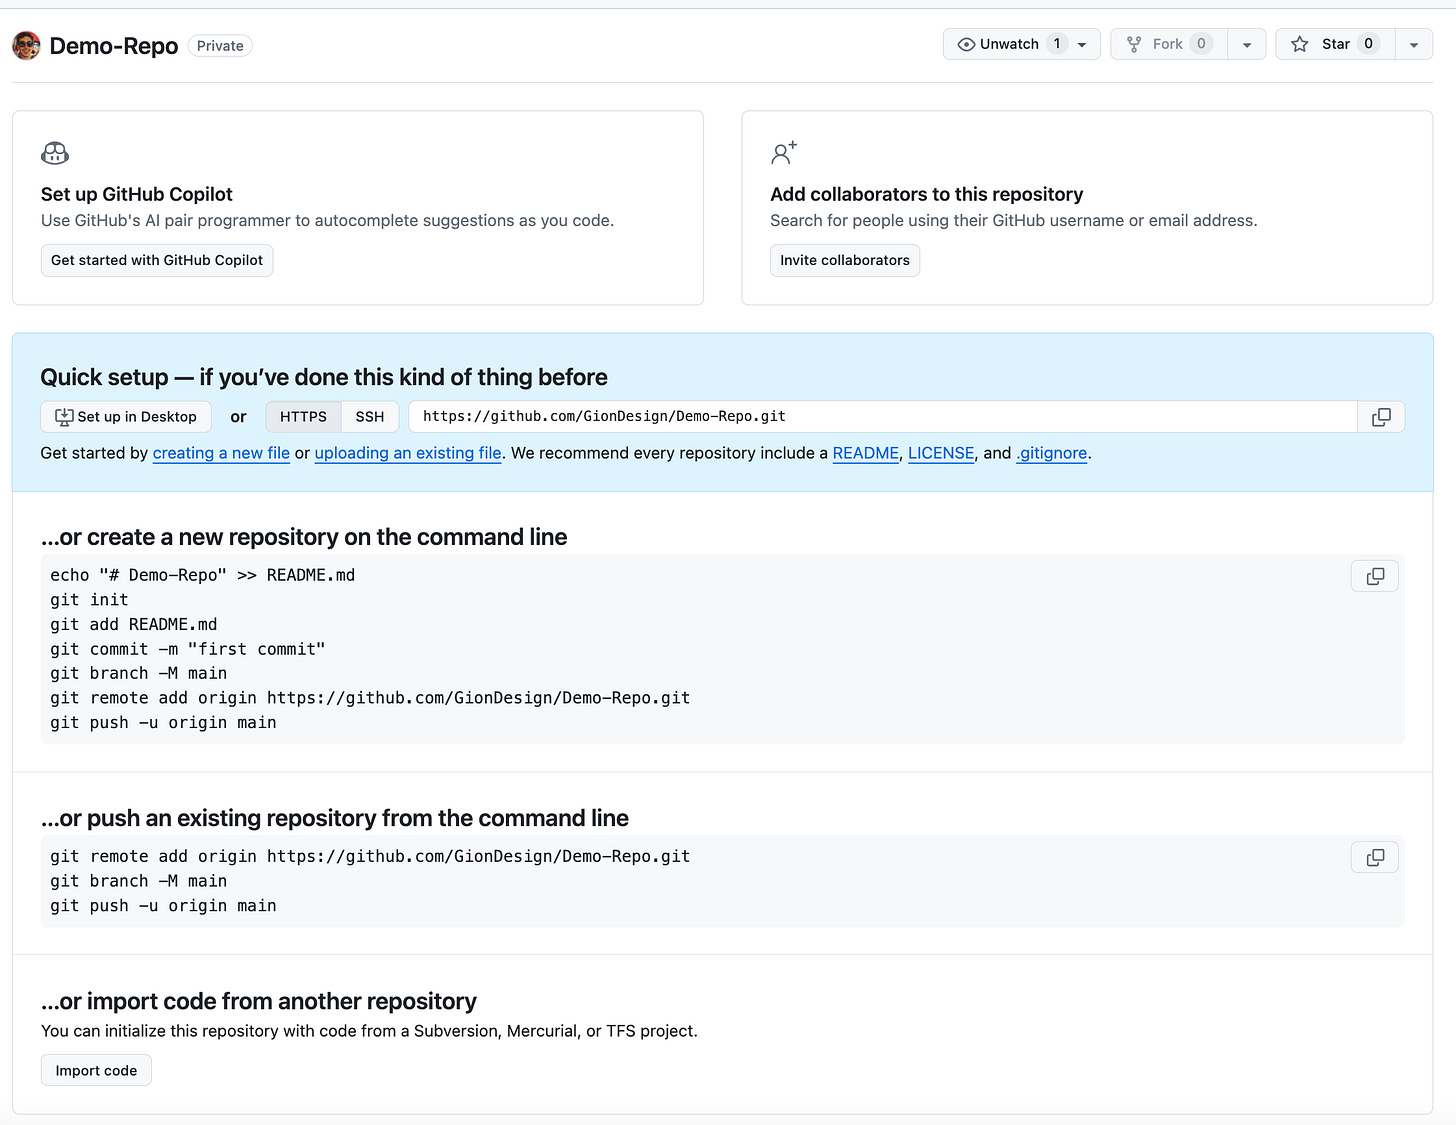
This will create a completely blank and empty repo with nothing in it and instructions on how to get your code to the repo.
Now you have your first empty repository in Github, nothing’s in it yet, just empty and blank, but we’ll go through that in the next step to link it up with your code.
Linking your repository to your local project
Now that there is a repo created in GitHub we need to link it to our local computer.
There are a few ways this can be done, if we start with an empty repository in github, there’s nothing to copy, so we need to create a project on our local machine and then push it up to the GitHub repo. If there was code already in the GitHub repo, then we would be pulling the the code down to our machine and using that as the project.
We’ll go through both ways of doing it via the CLI and also using a GUI (Gitkraken), so let’s start with creating a project on our computer and pushing it up first.
Link repo via Command Line Interface (CLI)
When using the CLI, we need to first create a Personal Access Token as this is going to be used in replacement of the GitHub password. GitHub has changed to use these tokens in replacement of passwords as you can specify the specific access and security of what it can access and also be repository specific.
So, lets have a look at creating that token…
Create a GitHub personal access token
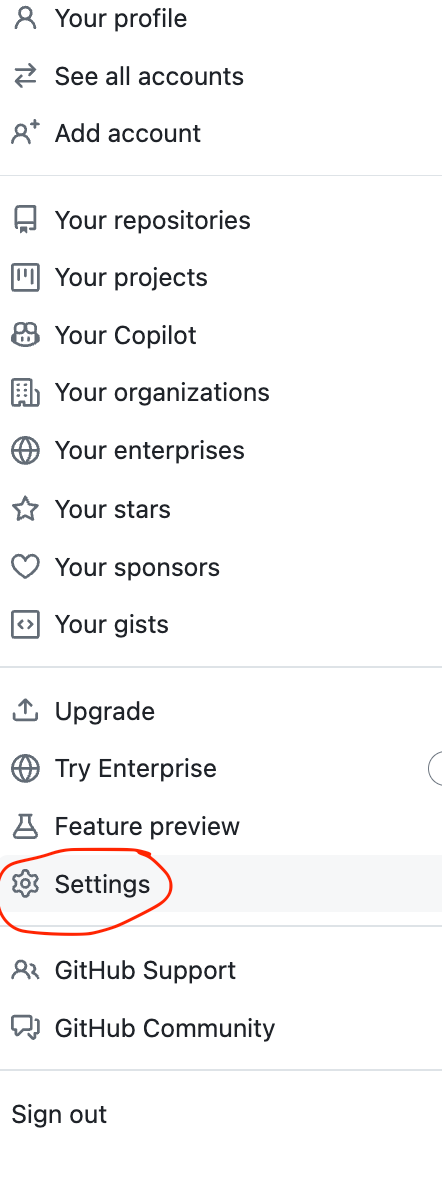
Once logged into Github, select the Settings option from the menu that opens when clicking your avatar.
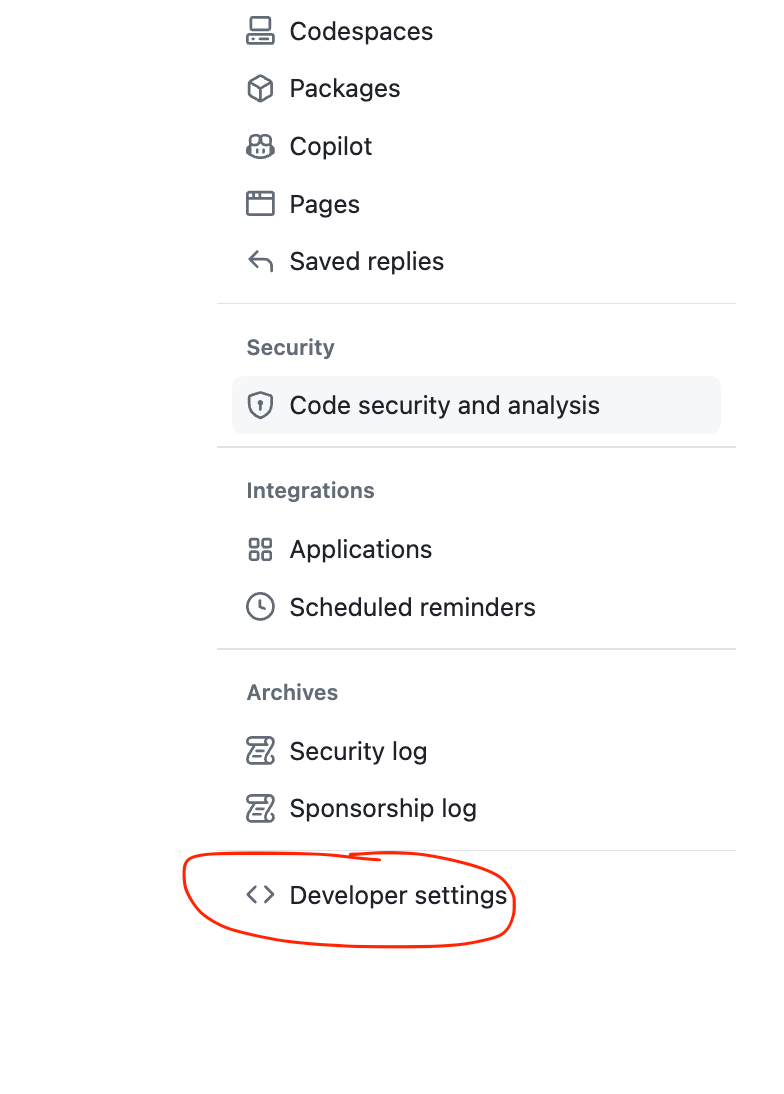
Then scroll all the way to the Developer settings on the settings menu.
This will open the developer settings menu and you can select the option for Personal access token and within that we will create a Fine-grained token so we can specify the settings for the token access.
Now on this page click on the Generate new token button to start generating a token.
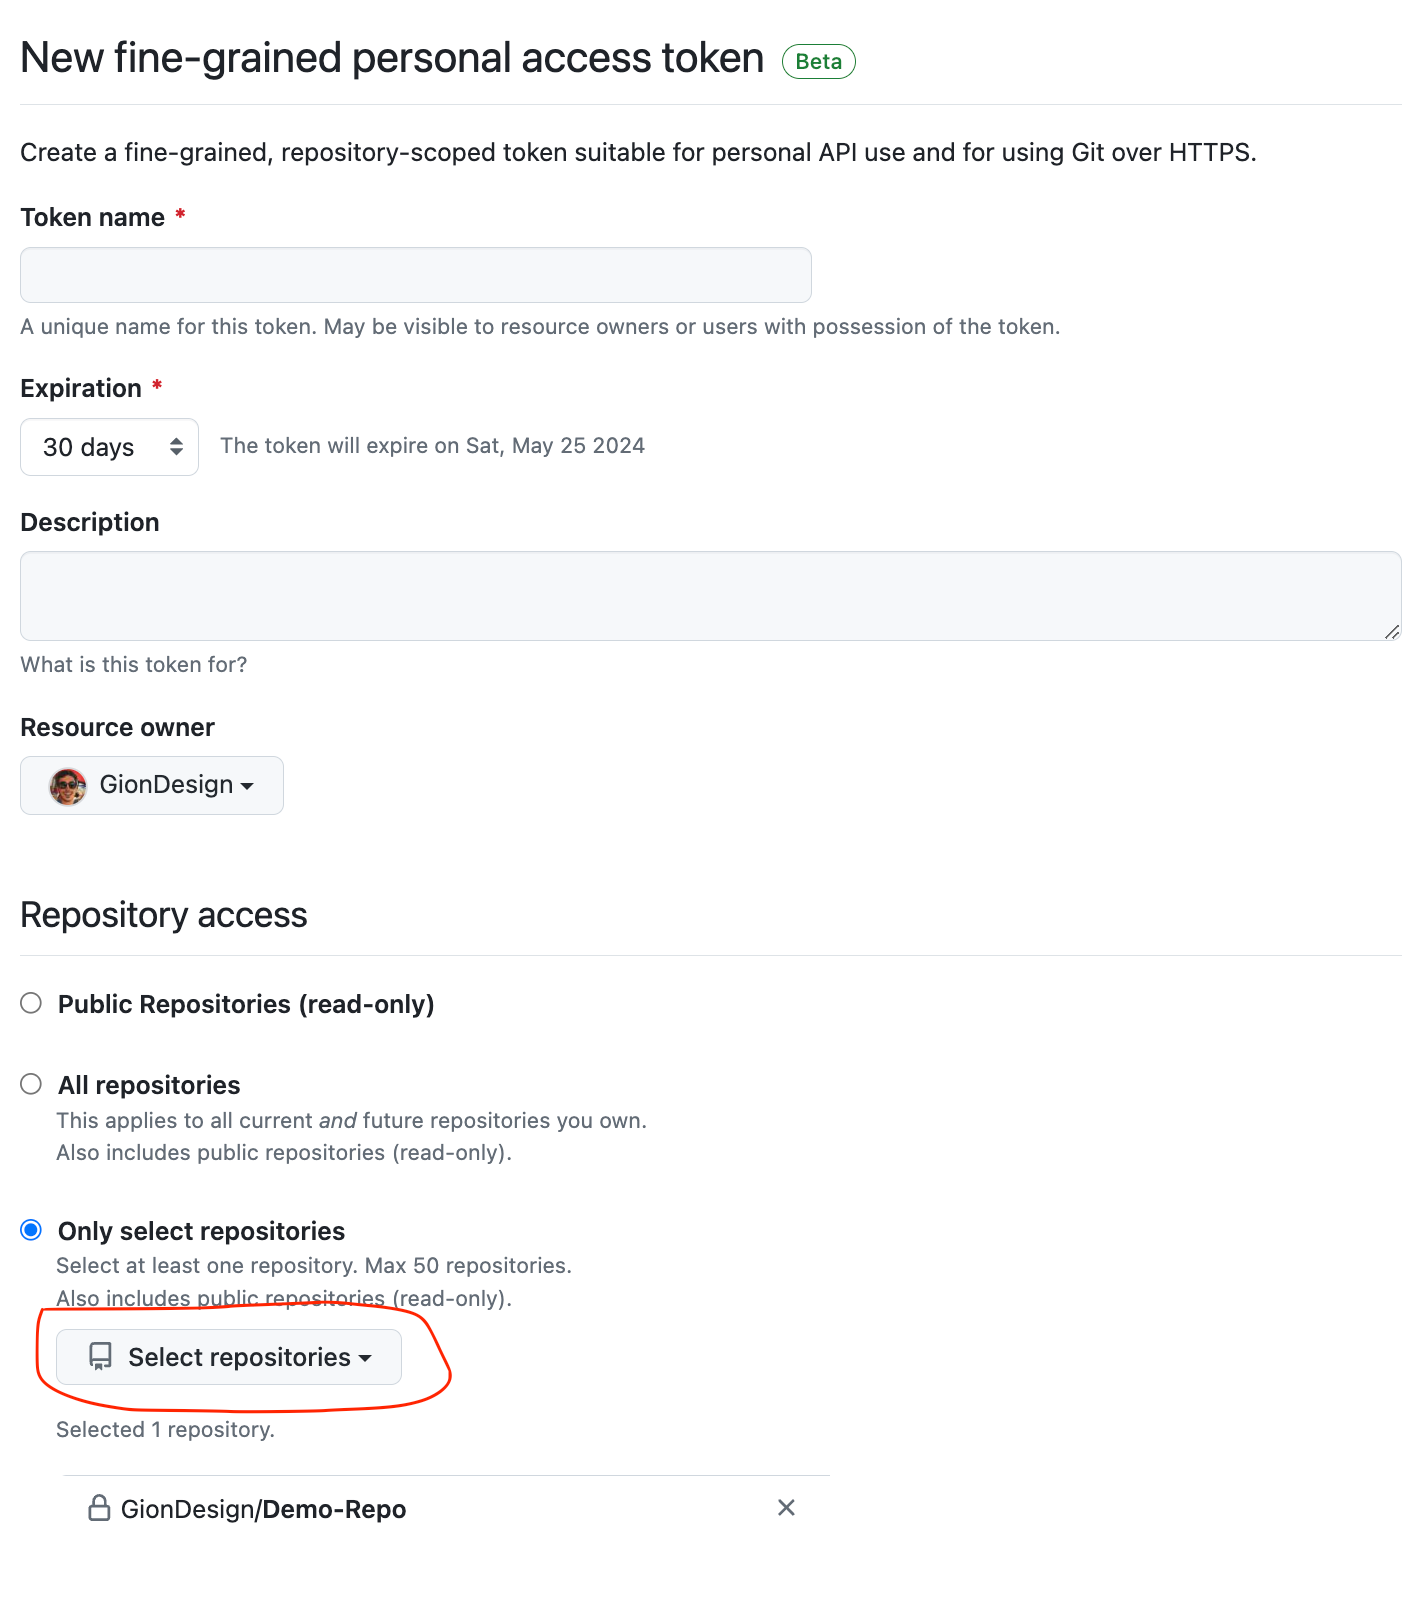
In the creation form we can complete the Token name that displays on the main page, the Expiration date for the token an optional Description and then we can select the Repository access
I like to select the Only select repositories option and then choose the repository in the select dropdown so that you can limit the access that this token has. This means if someone else gets the token they can’t access all your other repositories or personal details.
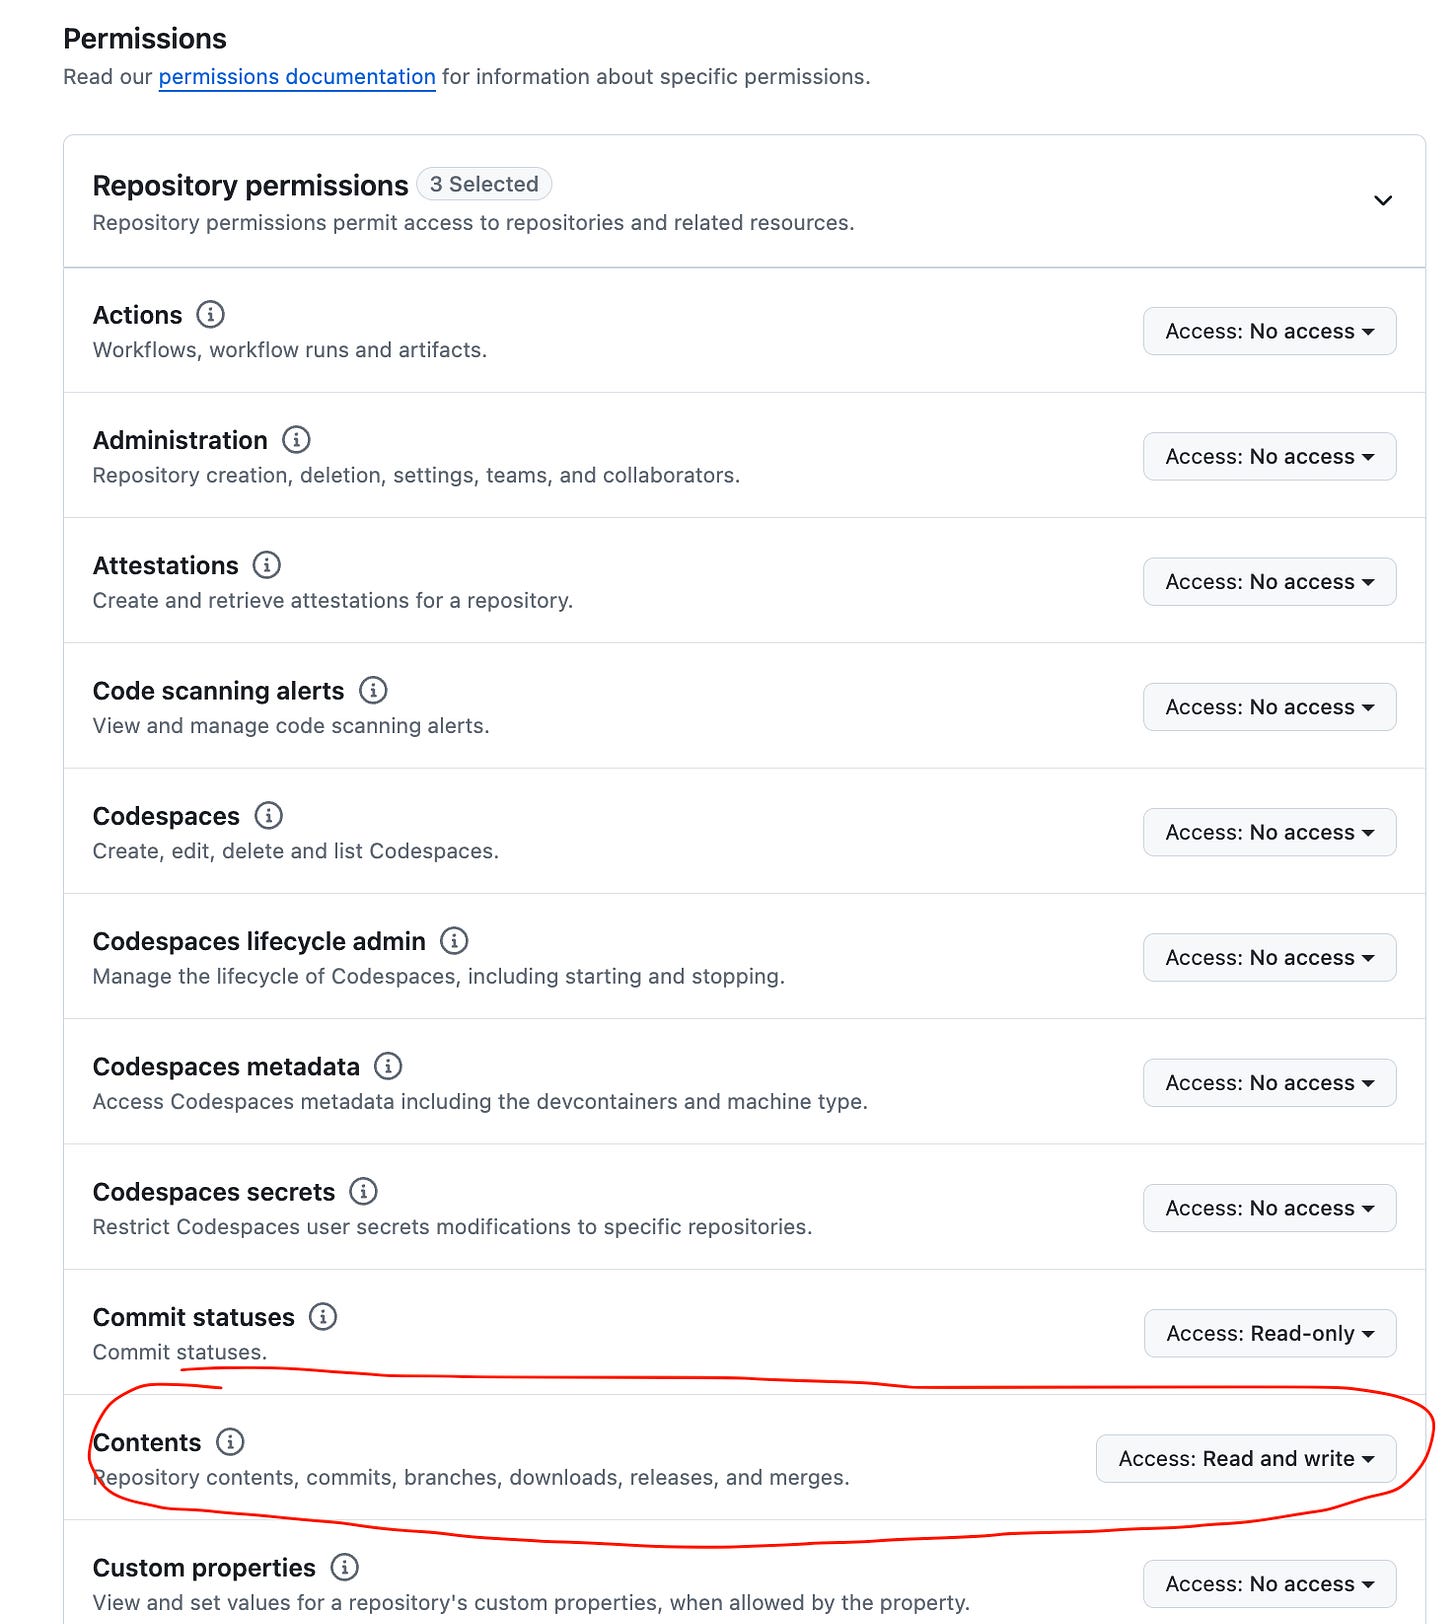
Next you can fine grain the settings for permissions and specify what the token can allow, for this example I’m going to just select the base required privileges for repo read and write access only (Contents), it may be best to select only the permissions required for the token that you need.
Then once completed, select the Generate token button at the bottom of the page.
This will create a 1 time code for the token, copy and use this, once it is removed from the screen you won’t be able to access it anymore and will need to generate a new token.
Creating a new project with CLI
If you don’t have a project setup already and we’re doing it from scratch, create a new folder on your computer and then open a Terminal console within that folder.
For me on my Mac I can create the folder and then right click on it and select New Terminal at Folder
This will open the Terminal within the folder and you can enter the commands that the empty repo suggests. This will create a README.md file and then add it to the folder, create a main branch, connects the repo and pushes up the code to GitHub.
The first time you try and connect to the repository it will ask for your login details to connect.
# creates a file called README.md with only content as a title of Demo-Repo
echo "# Demo-Repo" >> README.md

# Initialises git for the project
git init

# adds the readme file to staging... sort of like a prep to confirm changes
git add README.md

# confirms the changes and sets a message to link to those changes with a unique hash
git commit -m "first commit"

# creates a main branch - this is sort of like the version of code and main means this is the one that is, like the name suggests, the main version that all developers will look at
git branch -M main

# link to the GitHub repo
git remote add origin https://github.com/GionDesign/Demo-Repo.git

# sends the current code that you have confirmed with the message "first commit" to GitHub repo and it will ask for your github username and password, for the password use the Personal Access Token we created earlier
git push -u origin main
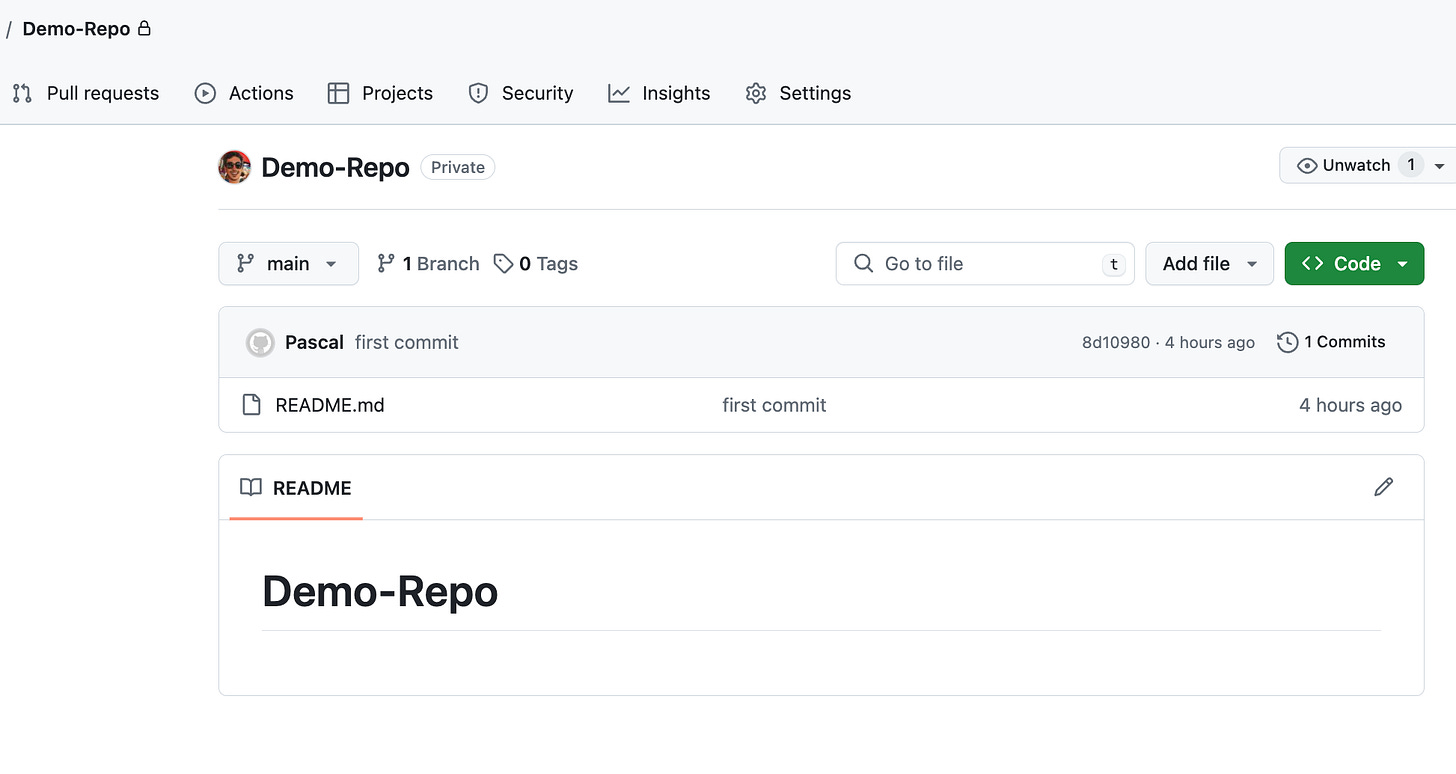
And now it’s completed, you can see the new contents are update in the GitHub dashboard:
Cloning an existing project with CLI
This is quite straight forward, no need to initialise anything or create branches, as we’re looking at a project that is already created and active on Github, so we’re copying down to our local machine or cloning it.
You still need to attain a Personal Access Token which you can attain from the above mentioned step.
*NOTE: Keep your personal access token private and secure, never share it!
Then open your terminal to a folder where you want to download and clone the repo to your computer and then you can simply enter this code:
git clone https://<your-access-token>@github.com/path/to/repoAnd this will clone the project to your local machine.
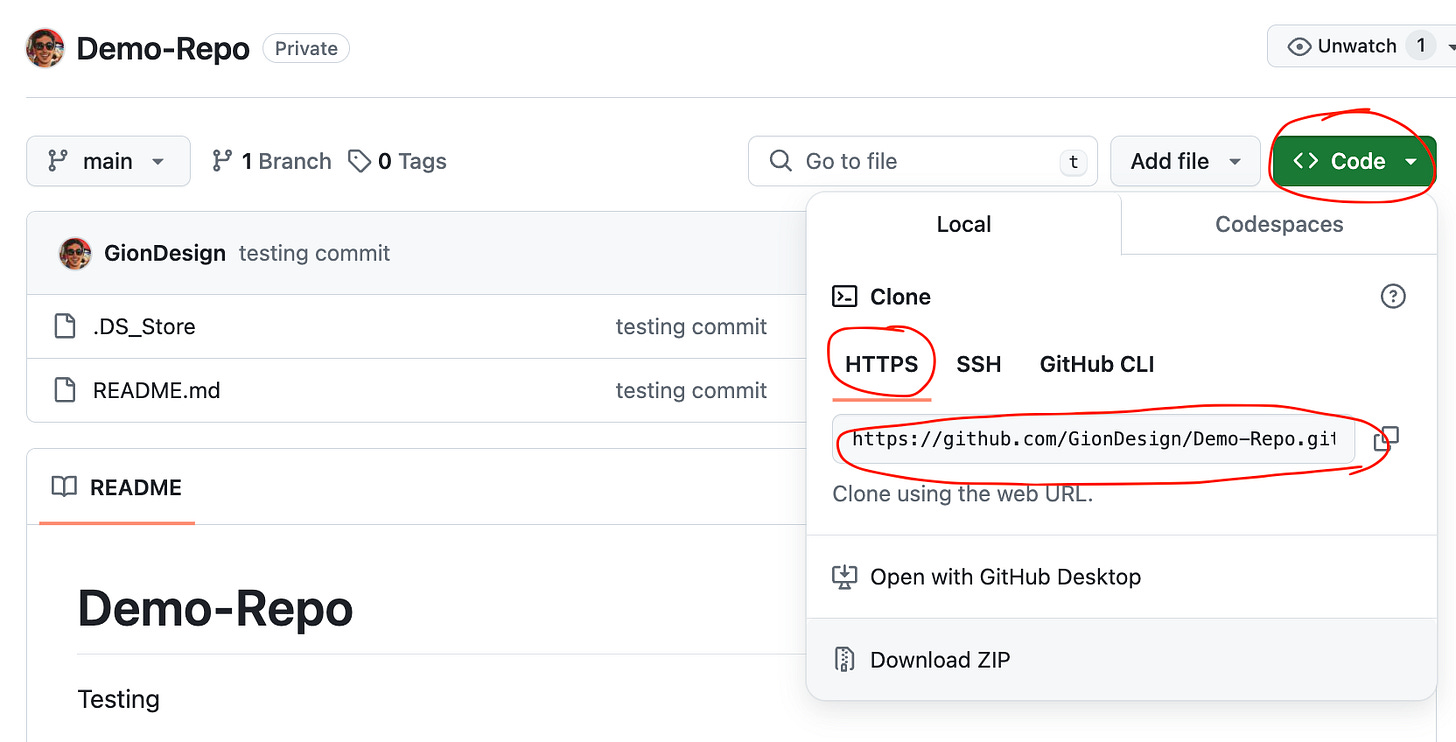
You can find the url in the repository under the Code button and we’re using the standard HTTPS method for this, you can also use SSH or GitHub CLI, but I’m not going through those in this guide.
Link repo via Gitkraken
Gitkraken as a Graphical User Interface(GUI) for managing git repositories. There are a few out there available and you can use any one you like, however from the ones I’ve used in the past, Gitkraken is my favourite and connects with multiple Git providers.
The first thing you need to do though is download the latest version of Gitkraken here:
It offers a free version for public repos and local repos, but if you have the student github pack you can get it for free while you’re a student: https://education.github.com/pack - It’s 100% worth it!
And even if you go for the base paid subscription for Pro it’s $4 per month, which is still worth it for the ease of access and how much it can help and improve your coding experience. I don’t work or get any benefits for Gitkraken, but I do think it’s a great tool and I use it every day.
Anyway, let’s get into linking repo’s…
Connect to GitHub
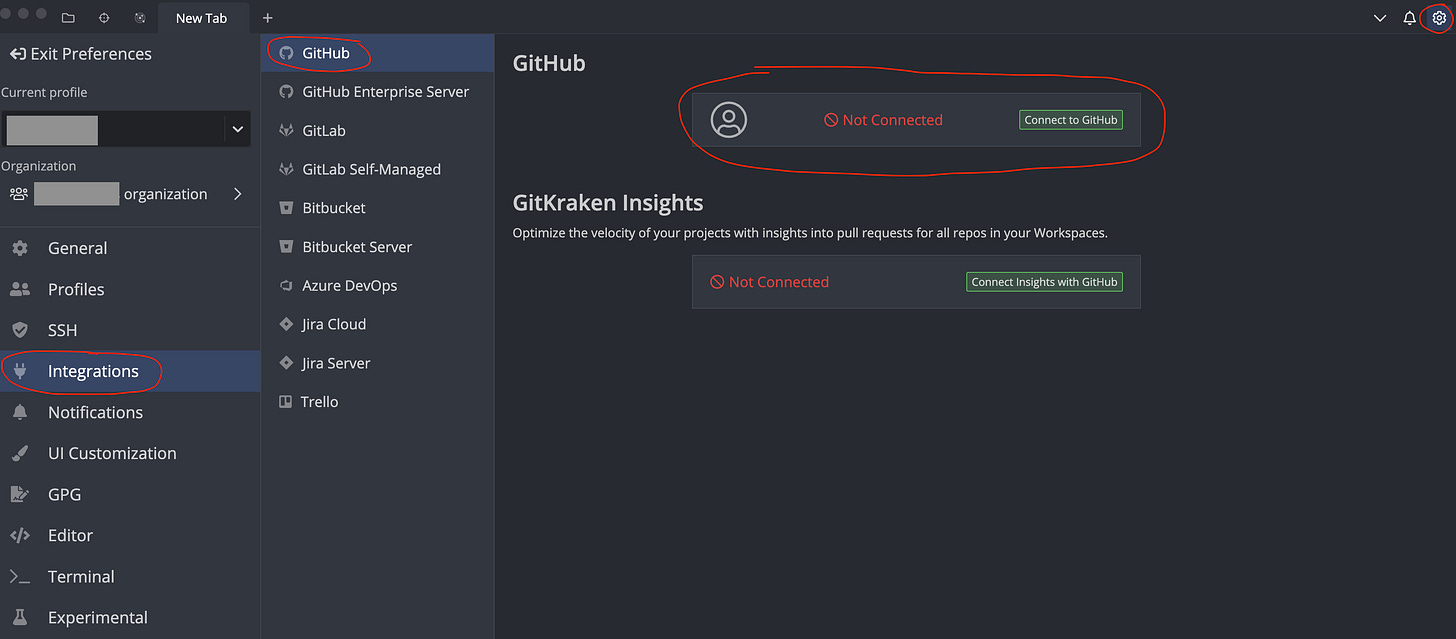
Once you open Gitkraken, you can connect to GiHub by selecting the Settings cog in the top right corner, then the Integrations item from the menu and select the GitHub option from the menu. For the first time, it will say it’s not connected.
From here, select the Connect to GitHub button and it will open the browser to login to your GitHub account if you’re not already logged in, but if you are it will automatically create a link with a code to your github account and ask to open Gitkraken to automatically link them. If for some reason there is an issue with opening Gitkraken, it will provide you a code that you can enter into Gitkrkaken to link your accounts
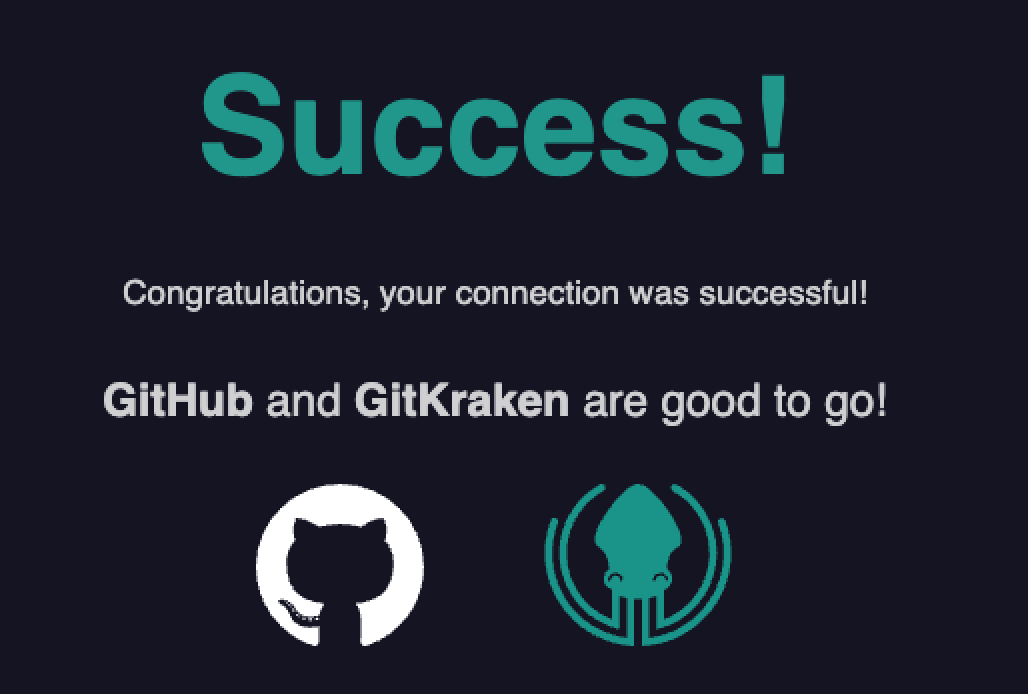
They’ve made it super easy to link them together and now it should say it’s connected
Now when you should have full access to view all your repo’s in your GitHub account, and use all the git actions in Gitkraken to interact with them.
Creating a new project with gitkraken
Ok, so with Gitkraken, they make it super easy to create and link repositories within their software.
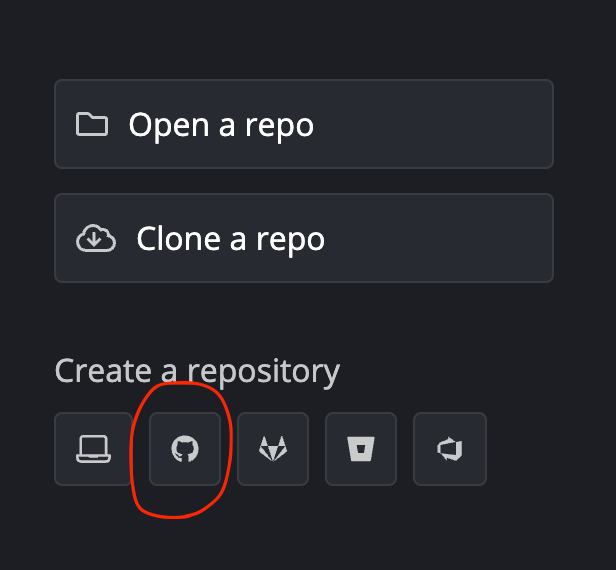
When you first open the software (or when you start a new tab/project), it gives you the option to Create a repository and you can select various options, but we’re going to select the GitHub option, so select the github icon
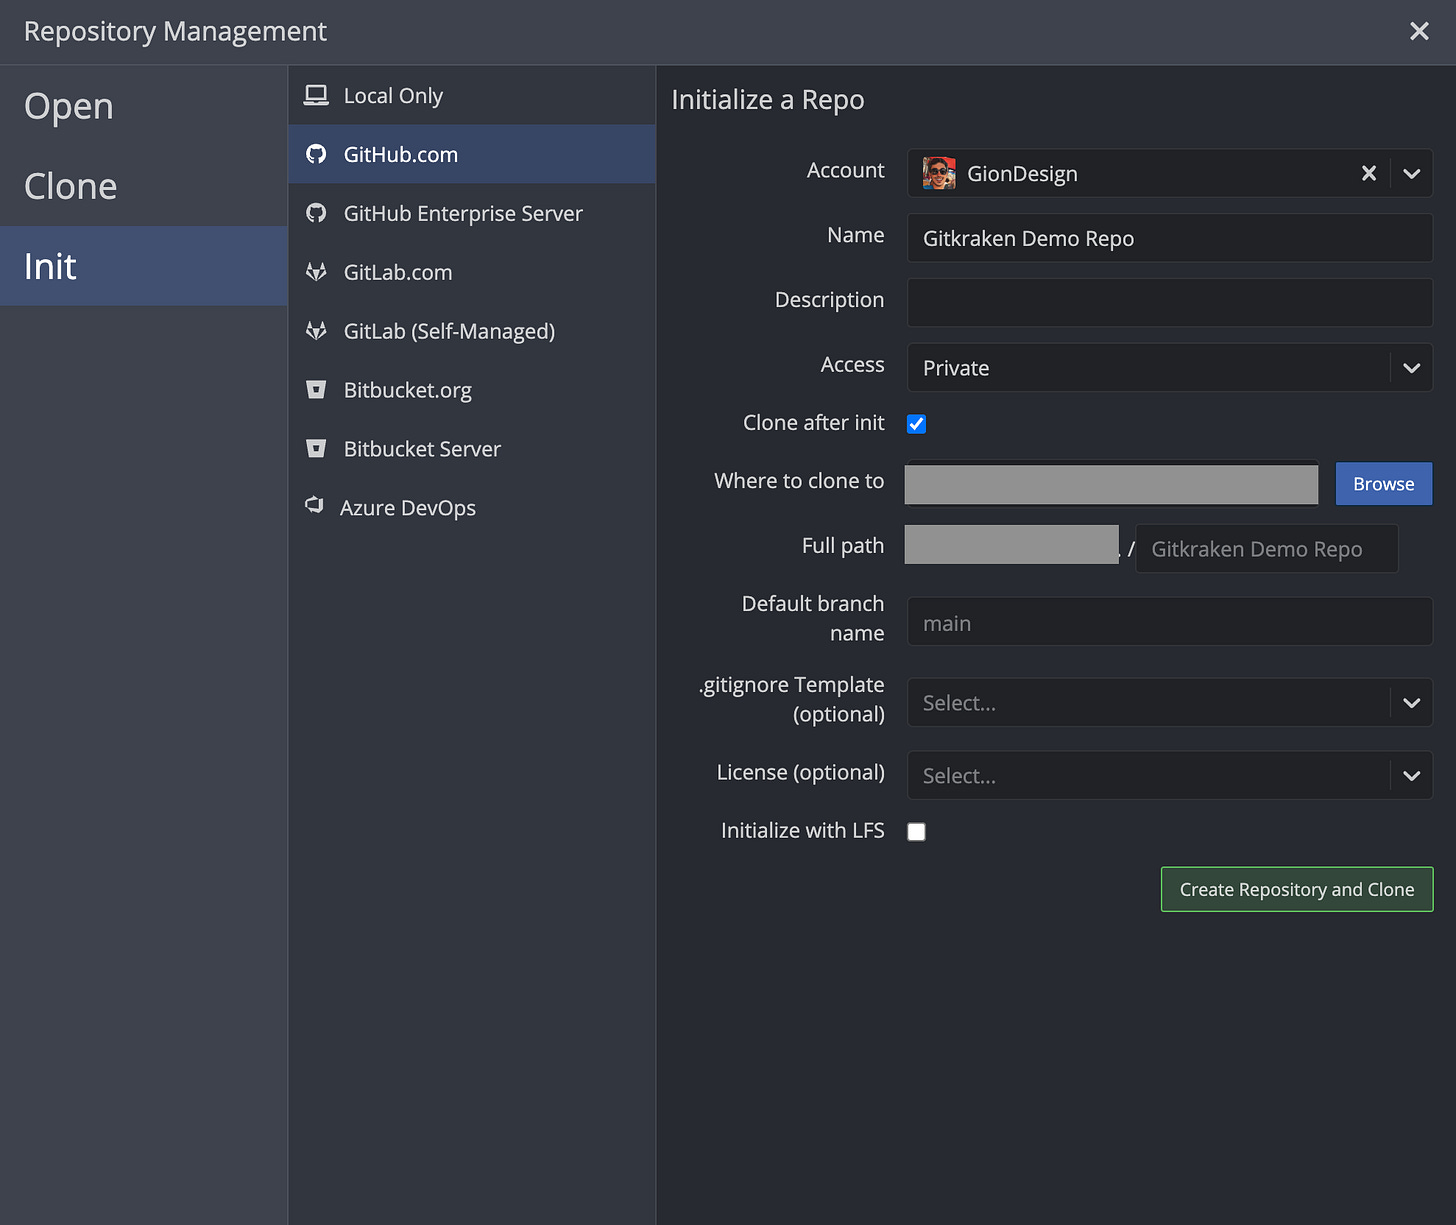
This will open the Initialize a Repo form, which is very handy as it will create a new repo in GitHub and at the same time it will clone and link it to your local machine in your chosen folder if you choose by selecting Clone after init, I’ve also set my repo to Private.
Once you fill out your details, click on Create Repository and Clone
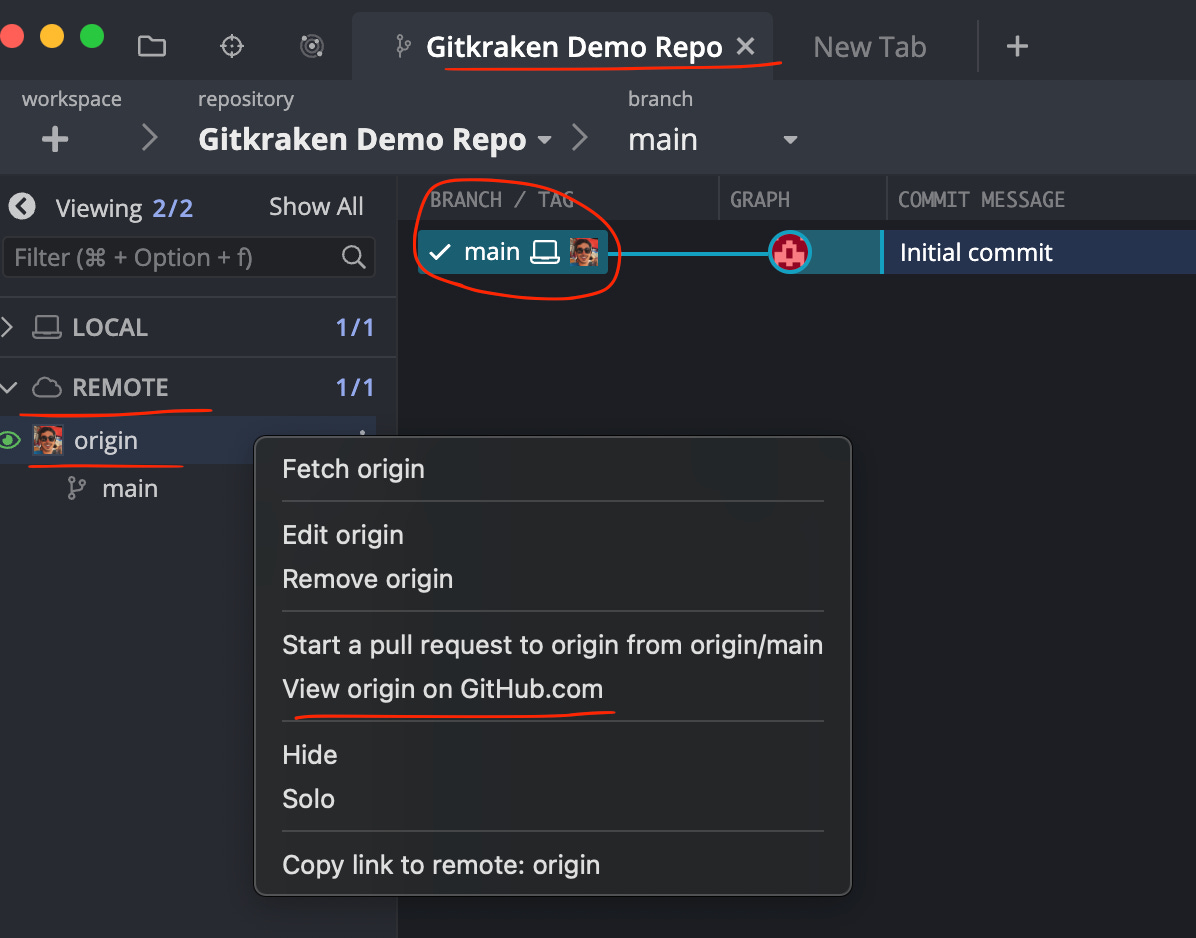
This will open the repo in Gitkraken with an initial repo and a basic README.md file, like what the code version did initially.
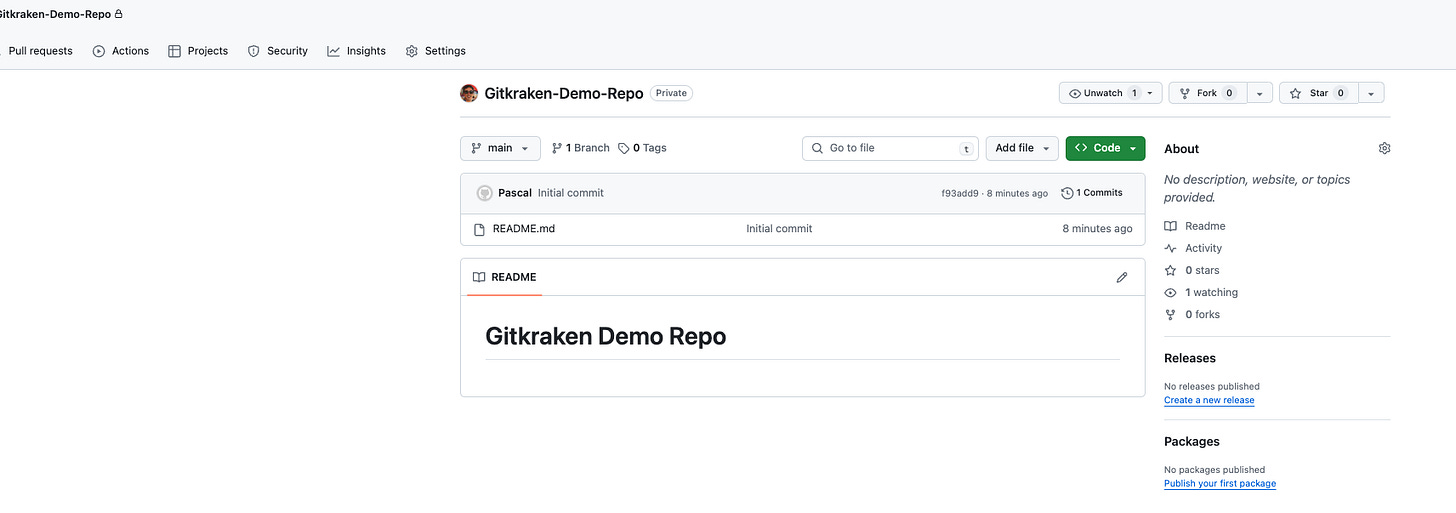
You can view the GitHub repo in the browser by opening REMOTE(which means the externally stored repo) and then right click on Origin and then selecting the View origin on GitHub.com and it will open the project in your browser.
There we go, super easy!
And it’s also linked it in your folder you chosen too
Cloning an existing project with Gitkraken
Cloning the repo is also super simple with Gitkraken. I’ve removed the repo i created on my local machine before (Gitkraken Demo Repo), but it’s url is still accessible in the GitHub dashboard as I didn’t remove it from there, it’s just totally removed from my computer.
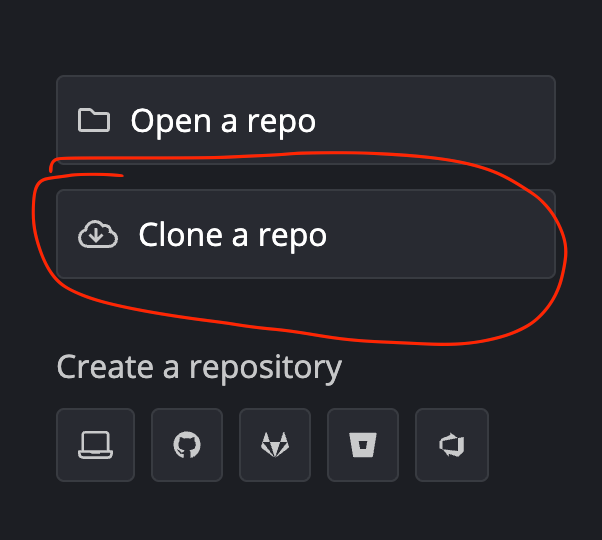
This time when we open Gitkraken or a new tab/project, select the Clone a repo button
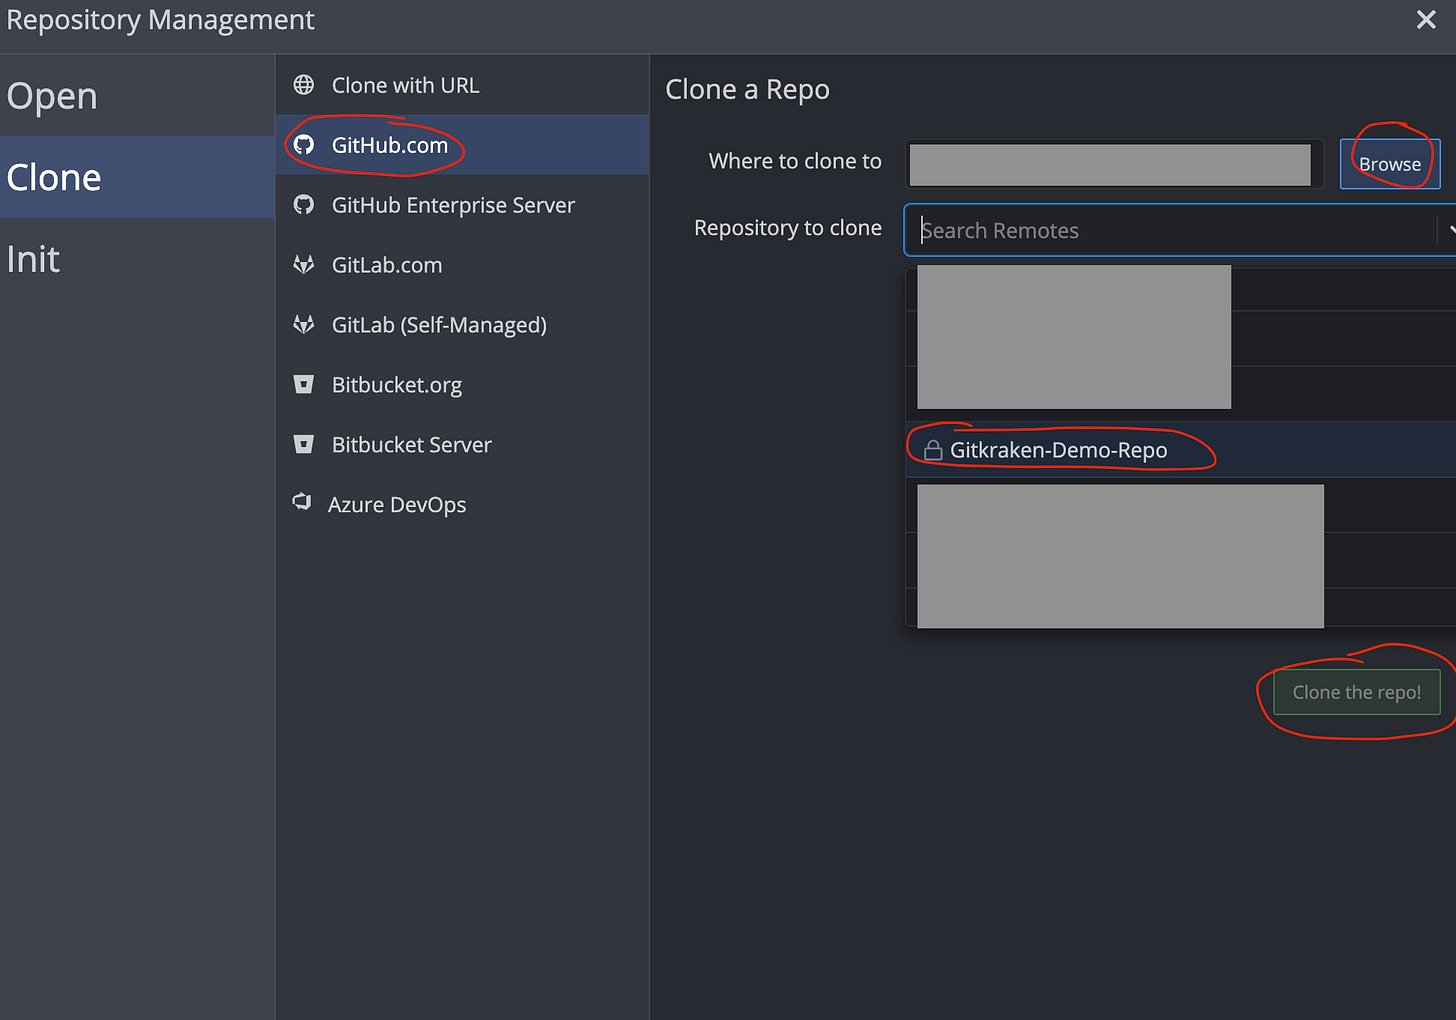
Now the Clone a Repo form will pop up, simply select where you want it to go on your computer and in the dropdown you should be able to select your repository from all the options in your account (I’ve just covered up a couple of the private ones I have in the works…) and then once selected, Clone the repo!
A popup will appear at the top of the window saying it’s completed and then click on Open Now to open the repo in Gitkraken… if you click on ok, it will close the popup and not open it in a tab, it’ll still clone, but you have to go and open the repo by searching for the folder.
And there we go! Everything we had before is back in the folder exactly the same as before without losing anything!
All done and you have the repo linked to GitHub!
Conclusion
Now you should know how to create a repo in GitHub and link it to your computer! We’ve gone through both the console version and the handy Gitkraken version to start your coding and protect your code with version control.
In another post I’ll go through how to interact with your repo and get the benefits of using Git. This post was focused on creating an initial repository and then linking it with your work.
The command line is definitely worth knowing, as sometimes issues can come along that can only be handled by the command line, but the Graphical User Interfaces (GUI’s) are 1000% worth using to help speed up your work and make things more visual.
There are multiple GUI’s available and in one of my previous posts (Source Control and Git - Resources) I share a link to the git list of GUI’s, but I personally would recommend Gitkraken as one of the best GUI’s out there and it’s available on Mac OS, Windows and Linux systems and if you have the GitHub student pack you will get it all for free!
And until next time, happy dev-ing peeps! 👋 😁


