Add AWS S3 Storage as Media Provider for Umbraco 13
Here we'll go through how to add Amazon Web Services (AWS) S3 Storage as a media storage provider for Umbraco 13
The initial Umbraco is great for a base setup and if you’re using the default settings, then it will save your media content, however it will store the media content locally on the server that the project is running on.
Contents we will go through:
This is great that you can use Umbraco out of the box straight away, however, this also means that your project size can scale in size quite rapidly when you start to include media sources and it can also lead to less control and access down the track of your media resources.
An option for this would be to store your media assets externally from the project so that you can control the access to the resources and it doesn’t blow up the size of your Umbraco running solution size either.
There are multiple options to setup a media provider, such as Azure blob storage that is very detailed in the Umbraco documents, however I’m going to run through the AWS setup and configuration to link that with your Umbraco service.
Pre-Requisites
Umbraco Project Setup on your Machine
Obviously, to install this plugin you need to have an Umbraco project setup on your local machine, if you haven’t done this step yet, you can follow a post I wrote on setting up a fresh install of Umbraco on your local machine here:
Setup AWS IAM policy and S3 bucket
This post is going to run through setting up the AWS S3 Package so it assumes that you have already created an AWS Account with an AWS IAM Policy and connected that to an AWS S3 Bucket.
If you haven’t done this yet, I’ve created an article on setting up an AWS IAM Policy and linking it to an AWS S3 Bucket in the below post which I would suggest you follow and complete before progressing as we’ll be using some of the credentials attained from that post:
Setup Git Source Control (optional - but recommended)
I’d recommend that you have source control and git setup of your project before progressing and creating a branch off your main project so you don’t break anything and can’t return to before you edited your code.
If you’re not sure about git and source control, I’ve written a previous post on Source control and Git in your project which you can find here:
Installing the NuGet Package
The package that we will be using is called AWS S3 Media File System Provider and it’s available within the Umbraco Marketplace as well as within the Umbraco Packages list on their website which you can find here:
This has some high level details of the application and you can also view a more detailed breakdown of the package details on their Github Repository which explains the installation and configuration steps.
Now, let’s go and install the package to your Umbraco 13 solution.
Open Terminal or your Command Line Interface (CLI) on your system and make sure it’s path is pointing to your Umbraco project.
cd /path/to/your/umbraco/projectOnce your in your project folder you can run the add package command and it will add the package to your solution:
dotnet add package Our.Umbraco.StorageProviders.AWSS3This will run the installer in your terminal and once completed it will add a line to your .csproj file like below:
Installing the AWS CLI
AWS has loads of security measures and services to integrate with and in order to use this integration it uses the AWS CLI to securely link to your AWS account and access the profile we will use for the project.
Now, it depends on the system that you’re using to how to install and configure your AWS CLI and the credentials, you can find the step by step guides here:
Make sure you choose the version that suits your system.
Once you have it installed you need to configure your credentials and access for the AWS services. Make sure that the credentials you use allows you to have access to the AWS S3 policy your created in the pre-requisite step.
If you’re on your own personal machine, most likely you’re set it up with the root main user account and this may have full access to all your AWS environments, this should work on your local machine, but if you are deploying the project elsewhere, then it’s recommended to only use the profile access that you set in the Setup AWS IAM policy and S3 bucket step.
*NOTE: If you are installing on an ubuntu server, like I have done to test, I've created a few lines of commands to enter in your Terminal at the Umbraco project folder that will ask you to prompt for the settings for your AWS IAM Profile:
sudo apt-get update
apt install unzip

curl "https://awscli.amazonaws.com/awscli-exe-linux-x86_64.zip" -o "awscliv2.zip"

unzip awscliv2.zip

sudo ./aws/install

aws configure
The above will step you through the Credentials to enter that will connect to your pre-configured AWS IAM Profile the details you’ll require are:
Secret Access Key - For the new user you created in the pre-requisite step
Access Key - For the new user you created in the pre-requisite step
AWS Region - For the new user you created in the pre-requisite step
Output Format (json)
You can follow full steps for Linux server setup for AWS CLI install on my recent post here:
Configuring the Package
Now that we have the AWS credentials and CLI installed, we can configure the Package in the code to function.
In Umbraco 13 there is no Startup.cs file initially to configure your project, everything is within the Program.cs file, so when looking at the official Github Repository for the package it references the Startup.cs file.
In our case, we can simply look at the Program.cs file.
At the top of the file we need to add a using to import the AWS package to use it, so at the very top, add:
using Our.Umbraco.StorageProviders.AWSS3.DependencyInjection;And then we need to add the package to the builder and the Middleware for it to pickup within the build of the solution:
// Program.cs
...

builder.CreateUmbracoBuilder()
    .AddBackOffice()
    .AddWebsite()
    .AddDeliveryApi()
    .AddComposers()
    // Add the AWS S3 Storage file system
    .AddAWSS3MediaFileSystem()
    .Build();

...

app.UseUmbraco()
    .WithMiddleware(u =>
    {
        u.UseBackOffice();
        u.UseWebsite();
        // Enables the AWS S3 Storage middleware for Media
        u.UseAWSS3MediaFileSystem();
    })
    .WithEndpoints(u =>
    {
        u.UseInstallerEndpoints();
        u.UseBackOfficeEndpoints();
        u.UseWebsiteEndpoints();
    });

...
So on a totally fresh install of Umbraco 13, the Program.cs file should look like the below:
// Program.cs

using Our.Umbraco.StorageProviders.AWSS3.DependencyInjection;

WebApplicationBuilder builder = WebApplication.CreateBuilder(args);

builder.CreateUmbracoBuilder()
    .AddBackOffice()
    .AddWebsite()
    .AddDeliveryApi()
    .AddComposers()
    // Add the AWS S3 Storage file system
    .AddAWSS3MediaFileSystem()
    .Build();

WebApplication app = builder.Build();

await app.BootUmbracoAsync();

app.UseStaticFiles();

app.UseUmbraco()
    .WithMiddleware(u =>
    {
        u.UseBackOffice();
        u.UseWebsite();
        // Enables the AWS S3 Storage middleware for Media
        u.UseAWSS3MediaFileSystem();
    })
    .WithEndpoints(u =>
    {
        u.UseInstallerEndpoints();
        u.UseBackOfficeEndpoints();
        u.UseWebsiteEndpoints();
    });

await app.RunAsync();
Now that we have the code setup to pickup the AWS configuration, we need to add the bucket name to pickup, which we can do in a couple ways, via Environment Variables or directly within the appsettings.json file.
Option 1 - Environment Variables
Depending on your environment, you can set the environment variables in your console or in the system. If it’s a linux based system you can add them by using the export command in the console and the variables we need to set are
Umbraco__Storage__AWSS3__Media__BucketNameAWS__Region
So an example of exporting it in the Terminal command line would be:
export Umbraco__Storage__AWSS3__Media__BucketName=bucket-name
export AWS__Region=your-region
*NOTE: Make sure you change bucket-name and your-region to your bucket name that you created
**NOTE: adding the environment variable in this way will only keep the variable for the current session, once your terminal window is closed it will lose the variable and you’ll need to add it again next time
Option 2 - Updating the appsettings.json File
This may be an easier option and you can also configure the bucket to be different based on the appsettings.json file you use.
You can have different ones based on Production or Development, but that’s a different topic that I’ll look into in another post when I get a chance.
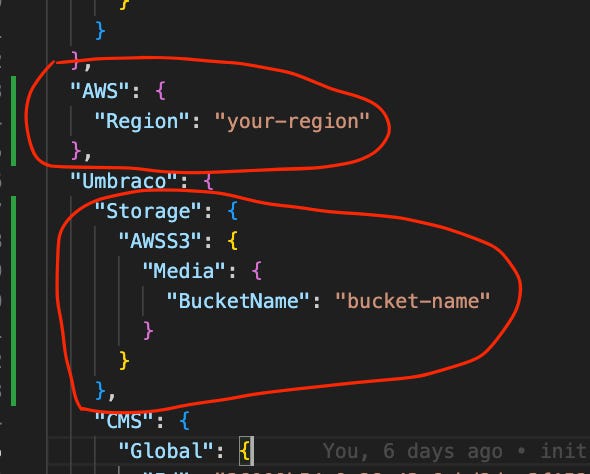
In your Umbraco project main folder, open the appsettings.json file and we just need to add the below code within the “Umbraco” sections of the json:
"Storage": {
  "AWSS3": {
    "Media": {
      "BucketName": "bucket-name"
    }
  }
},
"AWS": {
"Region": "your-region"
},*NOTE: Make sure you adjust the bucket-name and your-region with your bucket name
Once completed that section of the appsettings.json should look like the below:
Run the project
After the configuration has been setup we are ready to run the project with the default settings and linking to the AWS S3 bucket.
To run the project, make sure you’re within the main Umbraco solution folder within your Terminal and run:
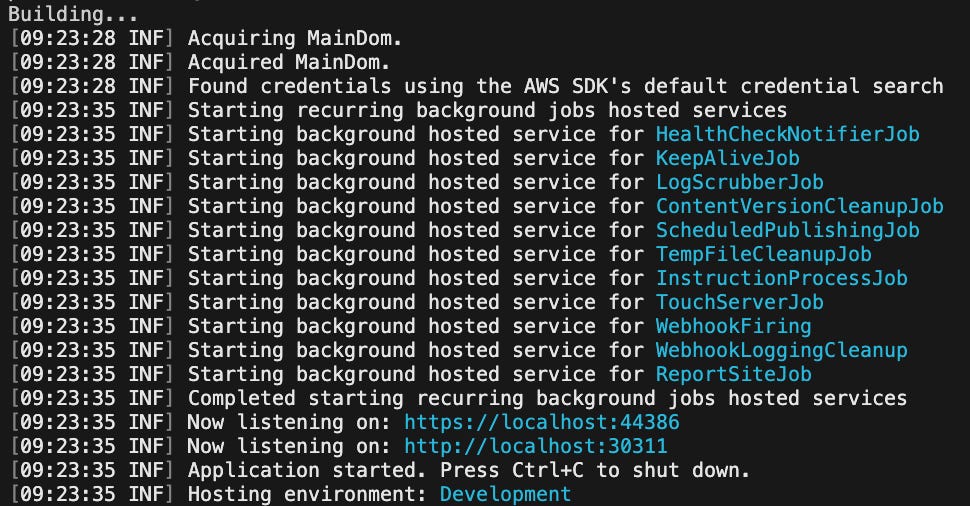
dotnet runThis will run the default settings, and if all is successful, then we should have a log off all the systems starting and the important line for AWS:
Found credentials using the AWS SDK's default credential search
And the whole running terminal should display like this:
Now you can go to the active url (in my case it’s https://localhost:44386) and any media content you upload using Umbraco will now be saved within the S3 bucket under your created user profile.
AWS S3 Bucket Files
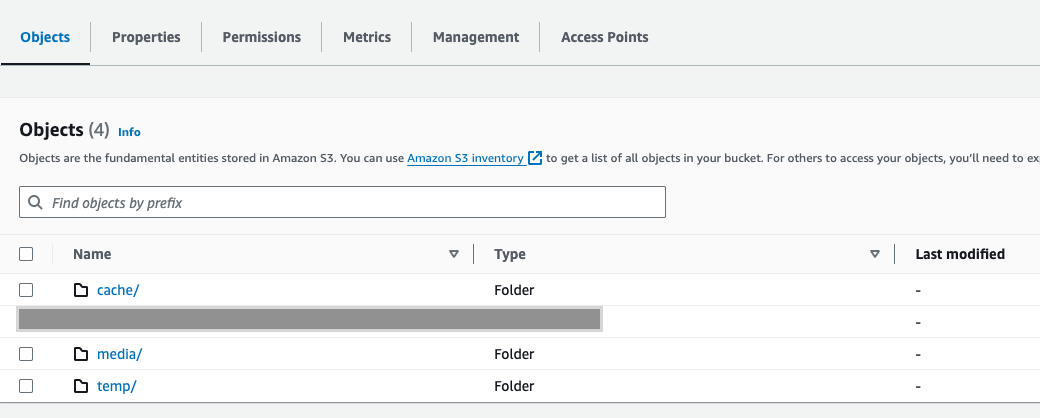
After uploading the files to AWS S3 it will create a couple folders within the bucket:
cache
temp
media
If you go to the AWS S3 dashboard and open the bucket, you’ll be able to view the folders and the files (in the image I have created manually an extra folder, so I’ve covered that one up that’s not relevant here)
You will be able to manage the files all within Umbraco, so if you remove an image or media content from Umbraco CMS, then it will also remove it from the bucket as well.
Another point to note, is that if you setup the bucket using the pre-requisite steps, then the bucket will be secured so users will not be able to access the bucket or it’s files directly using the file links as they need to have the user permission that are only available via the server for the Umbraco instance to access and serve to the users via it’s own settings.
Conclusion
Now we’ve run through how to install and setup the AWS S3 Media File System Provider and link it to your Umbraco project through the AWS IAM Profiles.
Now you should be able to externally host your media content separately to your Umbraco solution that makes it easier to manage and control your content.
Hope this helps you in your coding and development, as it took me a few tries to be able to get this up and running, hope it will speed up your time for next build and integration you do.
Happy dev-ing! :)


What if we are unable to upload any media files and umbraco throws unknown errors?